Tuesday, 29 January 2013

Fix desktop.ini Auto Open in Notepad on Boot Up in Windows 8

Some windows 8 users, like me may have noticed that a Notepad window will automatically open upon every system startup or reboot. The Notepad will open desktop.ini with the following text:
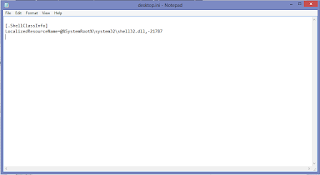
[.ShellClassInfo]
LocalizedResourceName=@%SystemRoot%\system32\shell32.dll,-21787
Obviously, it’s a ‘bug’ that a desktop.ini file been mistakenly been placed or created on a location where it should not. To fix the desktop.ini auto open on Windows 8 is pretty easy, just by removing and deleting the desktop.ini from the Startup folder, which Windows operating system loads on every boot up.

  1. Open Windows Explorer, then click on View ->  Options.
  2. Go to View tab.
  3. Under “Files and folders” tree, select Show hidden files, folders and drives.
  4. Uncheck Hide protected operating system files in order to be able to view the hidden desktop.ini file.
  5. Click OK when done.
  6. Navigate to C:\ProgramData\Microsoft\Windows\Start Menu\Programs\Startup folder, or alternatively, just type shell:common startup in Start Search and hit Enter.
  7. Delete desktop.ini file inside the folder.
  8. Navigate to C:\Users\USERNAME\AppData\Roaming\Microsoft\Windows\Start Menu\Programs\Startup folder, or alternatively, just type shell:startup in Start Search and hit Enter.
  9. Delete desktop.ini file inside the folder.
  10. The bug has been fixed, and no Notepad window with desktop.ini will appear on reboot or startup anymore.

Tuesday, 22 January 2013

Finally! Microsoft Surface Pro Tablet Going On Sale


Some seven months after it was announced, the Microsoft Surface Windows 8 Pro is finally hitting stores on Feb. 9. The made-by-Microsoft tablet with the full version of Windows will be available at Microsoft retail stores, on the Microsoft Store online, at Best Buy and Staples. The 64-GB model is $899, while the 128-GB model is $999. Both ship with the Surface Pen input device. If you want a Type Cover or Touch Cover — the snap-in keyboard — you’ll need to buy it separately.
The Pro is bigger, heavier and faster than its little brother, the Surface RT. Moreover, while the RT can only run Microsoft Store applications and a stripped-down version of Windows, the Pro runs a full version of Windows 8 Pro capable of running both new Store apps as well as desktop programs and legacy Windows applications. The Surface Pro clocks in at 10.81 x 6.81 x 0.53 inches and weighs slightly less than two pounds. It has a 1920 x 1080 pixel, 10.6-inch display, and an Intel Core i5 Processor. It has front- and rear-facing 720P cameras, a microSDXC card slot, Wi-Fi support for 802.11a/b/g/n, and Bluetooth 4.0.
Microsoft also announced that the 64-GB Surface Windows RT will be available as a standalone version without a Touch Cover for $599 starting Feb. 9.
Although quite a number of people go against calling this a tablet, as it dones quite a number of features and characteristics.... Since its actually sort of a pre-modified Laptop... They say call it "Hybrid".. Lol

Monday, 21 January 2013

Samsung Chronos (Speed, Multimedia and Gaming at its Peak)

Samsung Electronics Co., Ltd, a global leader in digital media and digital convergence technologies, Early this year announced two additions to its high performance Series 7 PC lineup: The enhanced Series 7 Chronos, which delivers professional performance in a thin and light form factor, and The Series 7 Ultra, which takes Ultrabooks to the next level with enriched computing power, graphics and touch capability.


New Series 7 Chronos – Professional, Powerful Performer
Delivering professional performance in a thinner and lighter form factor, the new Series 7 Chronos provides enhanced processing power for professional users and a new software solution RAMaccelerator**** that provides up to a 150 percent increase in speed for browsing and running apps by taking advantage of the existing memory. Ten-finger multi-touch capabilities enhance the overall experience, allowing the user to interact directly with the screen, as well as the touchpad and keyboard. With a full aluminum body, the new Series 7 Chronos follows the design DNA of its predecessor while packing a powerful Intel® quad-core processor with up to 16GB* of memory, up to 1TB*** of storage and dedicated 2GB external graphics into a slim chassis that measures just 20.9mm (0.82 inches).

The Series 7 Chronos enables creation of heavy content for professional use with increased efficiency and productivity, anywhere and anytime. Catering to the needs of professionals, the new Series 7 Chronos features a high resolution, Full HD display (1920x1080), with 300nit brightness, as well as rich sound with JBL® optimized speakers, enhanced graphics to run hardcore tasks, and an extended battery life of 11.5 hours**. The laptop wakes up in as little as two seconds and boots in under twelve seconds, making it ready at a moment’s notice to access virtually anything the user needs for serious work.

 Series 7 Ultra – A New Ultrabook Experience
As the first Ultra in the Series 7 family, the Series 7 Ultra embodies superior mobility and performance in an ultra-slim and light, full aluminum body. Designed as the ultimate Ultrabook for multimedia, the Series 7 Ultra offers crisp visuals as well as powerful sound features. Enjoy videos and images on a Full HD display (1920x1080) featuring 350nit brightness, while JBL optimized speakers and AMD® graphics complete the experience. The laptop’s display is brighter and wider than previous models and features a 178-degree viewing angle, making it great for sharing multimedia with friends and family, or work content with colleagues.

Up to eight hours of battery life** keeps users connected all day, while the latest Intel® Core™ i5 or i7 processors and up to 256GB SSD*** of storage provide the computing power required by even the most demanding users. The laptop’s ten-finger intuitive touch capabilities and six second boot-up time maximize on-the-go productivity. The device will also be available with 4G LTE connectivity, further enhancing accessibility from anywhere (touch model based). Connecting to other devices is almost never an issue with three USB 3.0 ports, as well as a LAN port and a slim security slot to help ensure the device is securely tethered when necessary.
 If you are a hardcore gamer or you need a pc running at Lightening speed, Then i'll suggest you add the Samsung Chronos to your list of gadgets for 2013,cos with the spec packed by the laptop, Life Couldn't Be More Easier.

Mobile Power Station ( 11000 mAh )[Recharging's Got Better]

Most of the latest mobile devices have integrated batteries with no option to purchase and carry extra batteries around.Some of us  might have a need to buy spare batteries when traveling or journeying long distances.
 The solution for the road warrior is now to carry some form of mobile power pack and one of the higher capacity ones Certified at  IOGEAR. The IOGEAR Ultra Capacity Mobile Power Station provides 11,000 mAh with two USB output ports. The model number is GMP10K and rather than the full six word name, the nickname of this power station is The 10K so that is what I will use in the rest of this review. 


The box contents include:
  • Mobile Power Station
  • USB to Micro-USB Cable
  • USB to A/C Power Adapter
  • Protective Carry Pouch
  • Quick Start Guide
  • Warranty Card
The carry pouch has a drawstring to keep the power station in the pouch. You can use the included USB to microUSB cable to recharge your microUSB devices, but there are no other cables included to charge your devices. You need to bring your device specific cable to charge up your devices.
Need a Portable Power Pack? Think  IOGEAR.

Friday, 18 January 2013

Dukeo Blog Review

For starters, I must admit that i am not exactly a fervent visitor to Stephen Kerwer's Blog "Dukeo" at http://www.dukeo.com. Nonetheless, i have visited the blog quite a number of times in recent times. Most especially following a link from twitter by @MeghanMBiro. A recent visit to the site drew my attention to an ongoing review contest worth $200 asking for a honest review.. This actually spiced me up to write this post and also take a closer look at the site, in terms of Look and feel, Content, Navigation and Miscellaneous Talks....

Look and Feel
On first visit to Dukeo, a visitor would definitely tend to feel involved as regards the cool blends of colors. The font size is cool and the text is quite easy to read. (No need for spectacles. Lol). The positioning of content is one thing to talk about... Although i love it, i still find the subscribe box a bit... you know distracting... But all this is made up for, with the quality of the contents of the box. And it is only placed like that on the homepage. Quite Understandable.

Content
Dukeo contains articles relating to Making money online, Blogging and Lots more. In terms of content, Wow!! I'm not a search engine optimist but with the frequent update of posts - not just any post, but quality and pretty informative ones -  i'll say its something. Although most of the posts are short, they are quite well furnished and worth more than the time spent on them.  Kudos.

Navigation
I really dont have much to say but to thank Ste for not clogging us with so much links on the menu bar. I appreciate the way most links are neatly positioned in the footer.... Leaving only three, very clear links and the logo on the menu bar.

Miscellaneous
Like i said earlier, i am not a fervent visitor but the articles i have happened to come across at Dukeo is one to write home about. I do not mean to hype the blog but its absolutely one to check out.

In short, Be sure to check it out.

Wednesday, 16 January 2013

Installing Windows 7 From a Flash Drive(works for 8 as well)


First:-You need convert your flash drive's filesystem to NTFS.
Requirements:
*USB Flash Drive (Minimum 4GB)
*Windows 7 or Windows 8 installation files.
Follow the below steps to create bootable Windows 7/Windows 8 USB drive using which you can install Windows 7 or Windows 8 easily.
Procedure:
1. Plug-in your USB flash drive to USB port and move all the contents from USB drive to a safe location on your system.
2. Open Command Prompt with admin rights. Use any of the below methods to open Command Prompt with admin rights.
*Type cmd in Start menu search box and hit Ctrl+ Shift+ Enter.
Or
*Go to Start menu > All programs > Accessories, right click on Command Prompt and select Run as administrator.
3. You need to know about the USB drive a little bit. Type in the following commands in the command prompt:
First type DISKPART and hit enter to see the below message.


Next type LIST DISK command and note down the Disk number (ex: Disk 1) of your USB flash drive. In the below screenshot my Flash Drive Disk no is Disk 1.

4. Next type all the below commands one by one. Here I assume that your disk drive no is “Disk 1”.If you have Disk 2 as your USB flash drive then use Disk 2.Refer the above step to confirm it.
So below are the commands you need to type and execute one by one:
SELECT DISK 1
CLEAN
CREATE PARTITION PRIMARY
SELECT PARTITION 1
ACTIVE
FORMAT FS=NTFS
(Format process may take few seconds)
ASSIGN
EXIT
Don’t close the command prompt as we need to execute one more command at the next step. Just minimize it.
Note:What we just did was to convert your Flash drive's Filesystem to NTFS.
Next step is to make your flash drive a bootable drive.
Insert your Windows7/Windows 8 DVD into the optical drive and check the drive letter of the DVD drive. In this guide I will assume that your DVD drive letter is “D” and USB drive letter is “H” (open my computer to verify that.).
6. Maximize the minimized Command Prompt in the 4th step.Type  the following command now:
D: CD BOOT and hit enter.Where “D” is your DVD drive letter.If your DVD drive letter is "E",then type 
E: CD BOOT and hit enter.
7. Type another command given below to update the USB drive with BOOTMGR compatible code.
BOOTSECT.EXE /NT60 H: 
Where “H” is your USB drive letter(Confirm from "my computer"). Once you enter the above command you will see the below message.


8. Copy your Windows 7 or Windows 8 DVD contents to the USB flash drive.
9. Your USB drive is ready to boot and install Windows 7 or Windows 8. Only thing you need to do is to change the boot priority at the BIOS to USB from the HDD or CD ROM drive.
To do this when you switch on your system,press the function key with the attribute SETUP (in my system,its F12),go to boot configuration/priority and change first boot device to 
USB DRIVE/REMOVABLE DISK.
Note: If you are not able to boot after following this guide, it means you haven’t set the BIOS priority to USB. If you got any problem in following this guide feel free to ask questions by leaving comment.

Touch screen Transforms into a Physical Keyboard

For tablet- and smartphone-owners who love their touchscreens but occasionally yearn for the feel of a physical keyboard, Fremont, Calif.-based company Tactus has unveiled new technology that unites both features on one gadget.
It developed a tactile user interface for touchscreen devices: transparent physical buttons that emerge from a tablet or smartphone's surface on demand. To see the technology in action, watch the video above.
"With the buttons enabled, users can push and type or rest their fingers as they would with any physical button or keyboard," Tactus explains on its website. "When the buttons are disabled, they recede into the screen, becoming invisible and leaving a smooth, seamless flat touchscreen with maximum viewing area."
This "Tactile Layer" technology integrates with a touchscreen device by replacing its cover glass.
While current smartphones include the option of haptic feedback, which causes on-screen keys to vibrate upon touch, Tactus says it's not the same as physical buttons.
Would you use this technology on your smartphone or tablet?TO view the video click here


Burn Disc Images (ISO) Using Command Prompt In Windows 8/7

Some of us might have encountered files ending with the extension .iso.This simply means it's a disc image file and needs to be burnt to a disc or (you extract the files in them using Win-image or Winrar).
 You can burn a disc image from the command prompt interface by passing the proper parameters.
To start burning a CD or DVD ISO file immediately from command prompt, simply type in:
isoburn /q drive:\file.iso
For example:  isoburn /q  c:\en_windows_7_ultimate_x64_dvd_X15-65922.iso (Note for command prompt)
Ensure the disc you want to write to has enough or more storage size than the size of the file you want to burn. 
 Alternatively,Windows 7 and 8 includes a free image burning utility called the Windows Disc Image Burner that allows you to quickly write CD and DVD images.

As shown in the image, you can pass only the ISO file location and click the Burn button within the utility.

Tuesday, 15 January 2013

Paralyzed Woman Aided by Brain Powered Robots

 Jan Scheuermann is paralyzed from the neck down, but with the help of a robotic arm controlled by her brain, she's now able to pour herself a glass of water to drink.
(Robotic arm)
Lancet Medical Journal ran a study using brain implants to control the robotic arm. Two sensors were placed in the motor cortex of her brain. Pulses of electricity inside her brain are translated into commands for the robot arm, which includes a bending elbow and wrist. In about two weeks, Scheuermann perfected the use of her new robot limb.
Scheuermann has progressively lost control over her body since she was diagnosed with spinocerebellar degeneration 13 years ago.

Monday, 14 January 2013

How To Download Videos From Youtube Easily in Any Format

Downloading videos from Youtube or any other video sharing website has been one of the many difficulties some happen to face using the internet. Here's a post on how to download Youtube videos using IDM.

In this tutorial, i'll be showing you a much easier way to download these videos from any video sharing website like Metacafe, Ted etc. Just follow the steps below to find out how to do this.

STEP 1: You must have Java Runtime Environment installed on your system to be able to use KeepVid as it makes use of Java applets. If you do not have JRE(Java Runtime Environment) installed, then click here to download it.


STEP 2: Go to the website you want to download the video from, say Youtube and copy the video Url.
STEP 3: Go to www.keepvid.com and paste the url you copied into the text field and click on download. Step 4: Wait for the Java applet to finish loading and now you'll be able to download your files in various formats available. Including 3gp, mp4 etc.

Which websites does KeepVid support?
Dailymotion, 4shared, 5min, 9you, AlterVideo.net, Aniboom, blip.tv, Break, Clipfish.de, Clipser, Clip.vn, CollegeHumor, Cracked, Current, dekhona.com, DivxStage.eu, eHow, eBaumsWorld, Ensonhaber, Facebook, Flickr, Flukiest, FunnyJunk, FunnyOrDie, FunnyPlace.org, Metacafe, MySpace, Ning, Photobucket, RuTube, SoundCloud, Stagevu, TED, Tudou, TwitVid, VBOX7, videobb, VideoWeed.es, Veoh, Vimeo, zShare.net.

Enjoy!!!
Related Posts Plugin for WordPress, Blogger...
 
Blogger Widgets Twitter Bird Gadget