There are several reasons and situations that requires one to create a partition or delete a previously created partition. But before we continue, i think its necessary for us to understand what a hard disk drive partition is.
What is a Partition?
Partitioning is the process of separating the volume of a hard disk drive into different parts. A practical example of a partition is dividing a large room, probably by erecting a blockade or by using wood to divide them proportionally in order for one to make use of the other part for something else.
Why should i partition my hard disk?
There are many conditions that requires one to create a partition. The major examples of these conditions include installing a new operating system alongside your normal everyday windows eg Ubuntu, windows 8 etc. You can also create a partition that will serve as backup for your important files and folders. It is advisable to create a partition before performing activities like those listed above to prevent loss of files or just purchase an external hard disk.
HOW TO CREATE A PARTITION
There are two main ways of partitioning a hard disk; one is to partition it when installing windows for the first time while the other is doing it after the windows installation. Here, we'll assume you have already installed windows on your pc and you now want to install ubuntu, which is another operating system on its own. Ubuntu is a linux operating system that some users will regard as more technical than windows. Every one has a right to his own opinion. Back to business, you can create a partition by using third party partition software like Easeus partition master or simply make use of the Disk Management utility in Windows. To begin partitioning with Disk Management;
Open the Run dialog box by pressing Winkey + R. Then type diskmgmt.msc and press enter.
Right-Click on the hard disk you want to partition(this is mostly the C: drive.)
Now select "shrink volume" from the drop down menu that appears.
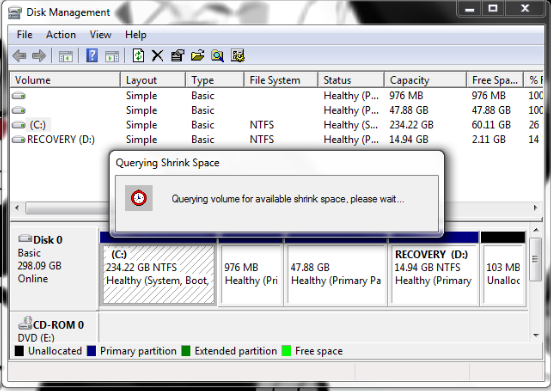
The utility will then begin to query the hard disk for the amount of shrinkable disk space.
A dialogue box will appear after this showing you the maximum disk size you can shrink.
Click Shrink and follow any instructions that may come up.
After Shrinking, you'll see the disk space as unallocated, right-click on this and select "New Simple Volume".
Now follow the instructions by pressing next
When you get to the image below, you choose to format the new partition if you want to use it as a backup or another partition on windows or choose "Do not format volume" if you want to use it for another Operating system, say Ubuntu.
.
Press finish to create the partition. And thats all, you've just created your partition.
If you are interested in getting Easeus Partition master, get it here now
Facebook Blogger Plugin: Bloggerized by AllBlogTools.com Enhanced by MyBloggerTricks.com
Post a Comment
Please drop your feedback in the comment box, for us to know how this post has helped. And don't forget to join, by using the 'Join this site' button on the right. Thank you
 Hey, my name is Ace. A blogger, web developer, gamer and Microsoft lover. Student of Unilorin and NACOSS Unilorin 2013 Programmer of the year.


0 comments:
Post a Comment
Please drop your feedback in the comment box, for us to know how this post has helped. And don't forget to join, by using the 'Join this site' button on the right. Thank you